Deep Space imaging with a Tracker and a DSLR – NO TELESCOPE
Preparation
Go online and find out what is in the sky and for information on this you can go to
http://www.calsky.com/cs.cgi/Calendar
Camera and Equipment Check Sheet
- Camera: (long exposures will be used, so camera with bulb mode is needed)
- A lot of memory cards
- A lot of batteries
- Steady tripod
- Star tracking system
- Dew controller (hand warmers work great if you attach them under your lens to stop the condensation, dew or frost from building up)
- Remote shutter release/ Intervalometer
- Proper footwear/ clothing
- Bug Spray
- Food and Drinks
- Flashlight (RED lights are recommended for your eyes, and any other light if you want to do some light painting and to see at night)
The steady tripod and solid ground is a major part of tracking and viewing in the night sky. The tripod should be very sterdy and setup in a level position or in a way that people, wind or anything won’t knock it over.
The tracker you can make or purchase. The one used here is a motorized tracker with 2 speeds of x0.5 which is for landscape shots to keep a crisp subject but also get a little more time on exposure in the sky. X1 is the speed which is used to tracker the stars at earth’s rotation. The tracker runs on 4xAA batteries and can last around 24hours with full charge.
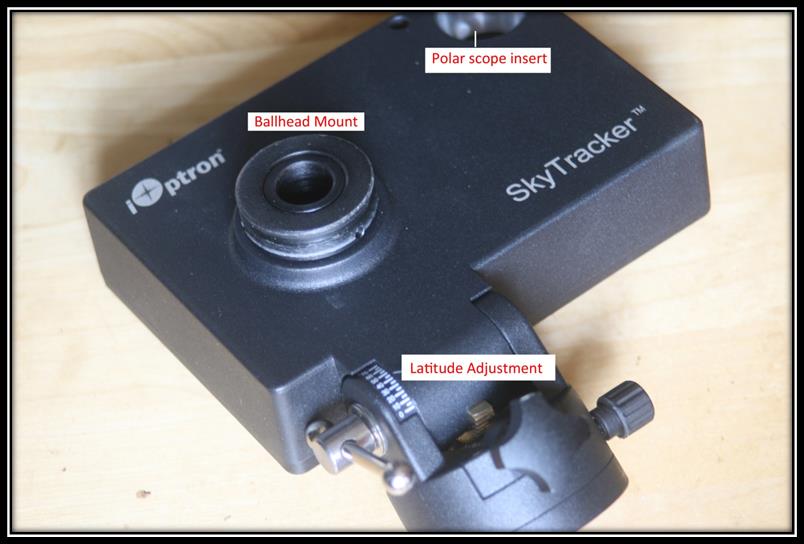
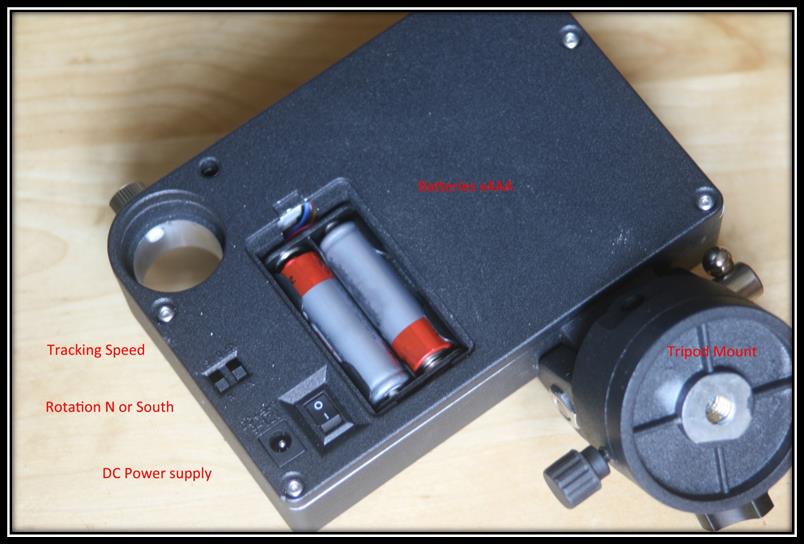
POLAR ALIGNMENT
Polar Scope view
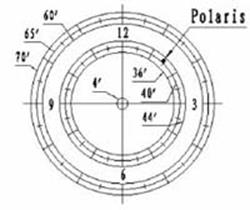
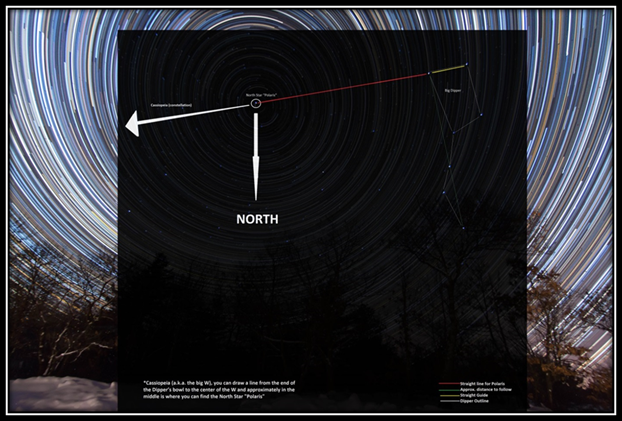
The polar scope is comes with the iOptron. It is a scope you look through and line up Polaris “The North Star” with in the target finder. Your latitude is the angle the scope will be pointed upwards to find Polaris. Polaris sits right in the middle of the Big Dipper (Ursa Major) and Cassiopeia (the “W”) and can be located by following out from the scoop to Cassiopeia, for more help refer to images below. The longitude and time is for lining up Polaris in your polar scope. Time and location of Polaris in the polar scope is key to getting the most accurate tracking and longest exposures without trails. For more information on finding where to line up Polaris in your scope you can download the app from iOptron.
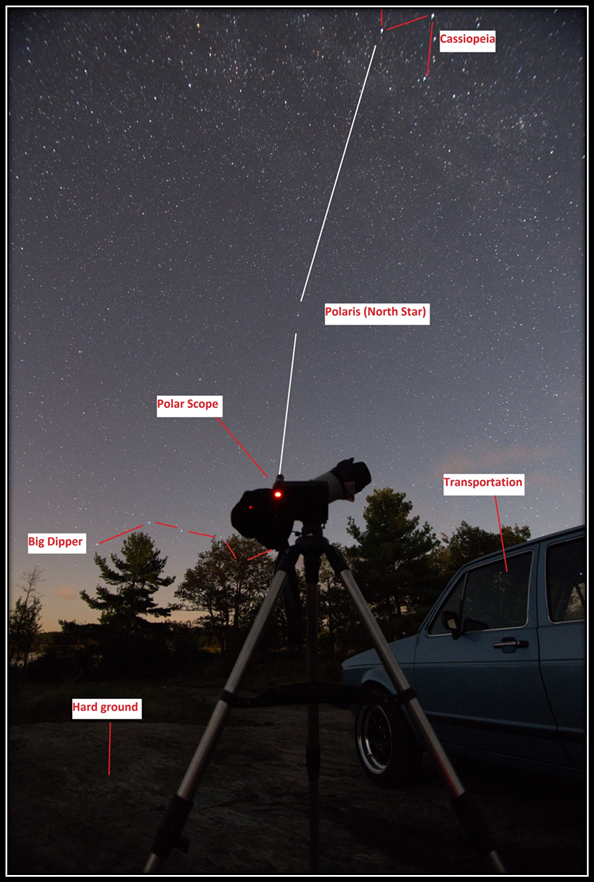
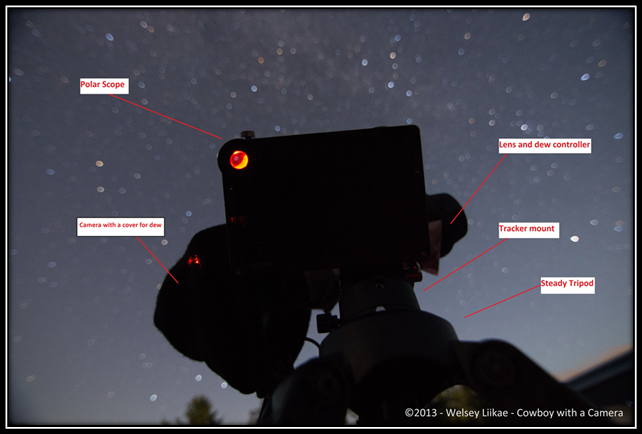
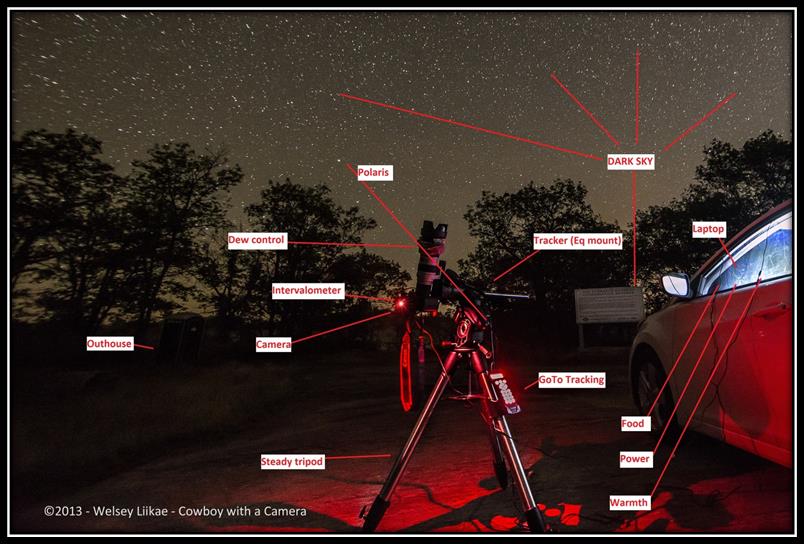
Now you can install your DLSR camera onto the ball head and point the camera to the sky you are interested in. Make sure all the screws/locks are tightened, select S/N switch based on your location and be sure to check the tracking speed of 1X for imaging, as ½ is for landscapes, or panning etc. Double check the polar alignment and realign it if needed. Turn the power switch on and enjoy the photographing.
To locate the objects you want to photograph you can use apps, such as StarWalk for iPhone, or do some research on Google to see find more information on the subject area. Some easily viewable objects to photograph are Andromeda Galaxy and the Orion Nebula. These you can photograph with any size lens and still get some detail but to get the most detail I recommend using a 200mm or larger lens.
Finding The Orion Nebula
The Orion Nebula (M42) is located in the Sword of the Orion Constellation and is the middle star in the sword, note in Orion’s Belt the most easterly star hold 2 more nebulae, Flame Nebula (NGC 2024) and Horsehead Nebula (Barnard 33)
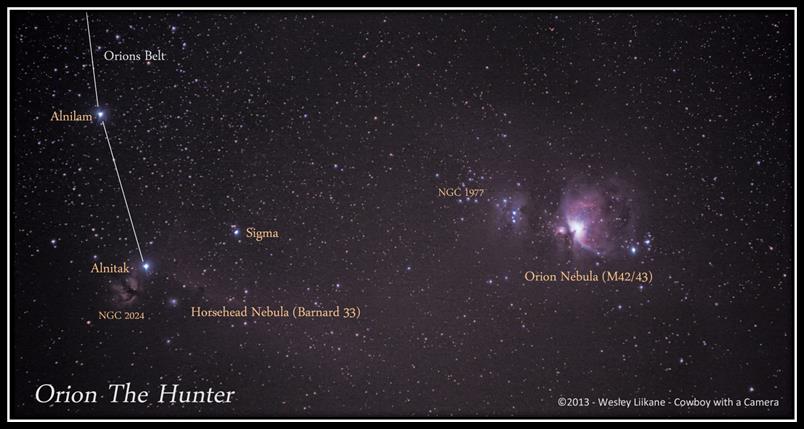
Above image was take with a Canon EOS 7D – Canon 70-200mm f/2.8 with Sigma x2 – f/5.6 @ 400mm – ISO 1600 – 179 seconds
20 Light Frames + 8 Dark Frames
FOCUSING AND EXPOSURE
Focusing and exposing can be very difficult at night and all must be done manually, also having a camera with a live view mode can really help. Point your camera towards a very bright object in the sky and turn ISO to max with your aperture wide open. Viewing through live view mode you may not see much, so zoom with live view to x5 or x10 and begin to slowly adjust your focus ring until the stars become nice sharp circles.
Now to locate the subject you would like to photograph in the sky you can loosen the ball head, zoom out and point towards the subject area. Taking shorter exposures with the highest ISO to see what is out there and in frame. Once you have located the object you wish to track, you can zoom in or keep shooting but remember to lower the ISO to around 800-3200. Also make sure you are shooting RAW to get as much data out of the image.
A good start would be a wide open aperture, ISO 800 and a 3 minute exposure. Be sure to zoom in the image all the way to make sure NO star trailing is taking place.
Note: Turn OFF long exposure noise reduction as it will take the same amount of time to process in your camera as the exposure. So if you shoot a 3 minute exposure the camera will take 3 minutes to process. Do not worry you will be taking dark frames manually which is why the camera takes so long to process.
Post Processing and Stacking
Software: Lightroom, Photoshop, DeepSkyStacker (DSS)
Link for DSS: http://deepskystacker.free.fr/english/index.html
Why stack? To bring out more details in the stars and faint objects like galaxies and nebulas.
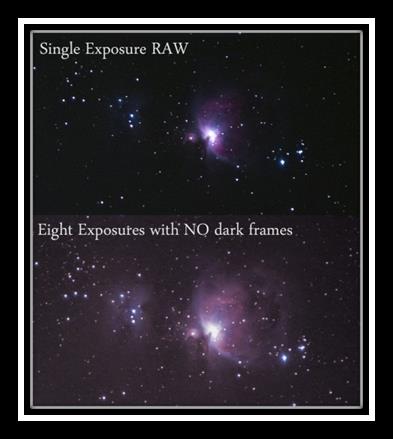
Image above is a crop of the Orion Nebula taken with a Canon EOS 7D – Canon 70-200mm f/2.8 – ISO 800 – 119seconds.
Above image shows the difference in detail with stacking.
In DeepSkyStacker (DSS) you can stack light, dark, flat and offset/bias frames. I choose to shoot only light frames and dark frames. Dark frame must be taken in the same conditions, temperature and setting as your light frames. These are taken by covering up your lens (putting your lens cap on) and shooting the exact same exposures used during the shoot, so it’s always good to take them just before, during or just after your shoot. The dark frames are the main part to reducing noise and eliminating hot pixels from your final image.
Once you have finished your shoot I would suggest loading them onto the computer and make folders for your images labeled “Lights” and “Darks” under each object photographed. This helps when loading in DSS.
DeepSkyStacker
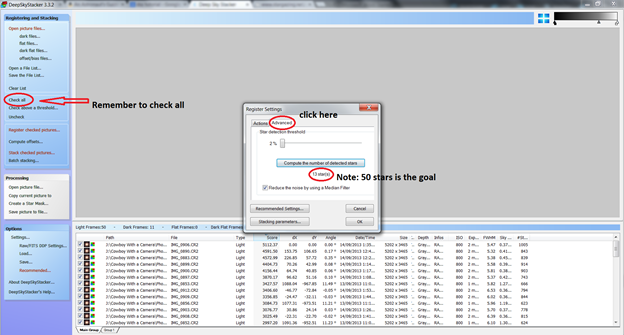
Light frames are very important for your final image so preview them, zoom in and make sure no images have any star trails (the ones with star trails should be deleted or moved to another folder) Once you have selected the images you would like to load, select Open picture files in DSS and then select desired light frames. Next, you will select “dark files…” in DSS and select your dark frames to be loaded. Once you have loaded your light frames and dark frames click “Check all” then click “Register checked pictures…” Select the advanced tab and click “compute the number of detected stars.” If the number of stars is too low or high it may not stack properly or may take very long to process. Try to get over 50 stars. Note this will not affect the number of stars in the final image and is only used for lining up the stars. No more than 100 will be used even if it says 1000 stars found. Once you have adjusted the threshold go back and select the best % area and insert the number you would like, usually 80-100% as we have already picked out most of the bad or trailed images. Then click ok and then ok again to start stacking. This process could take a while so now is the time to go grab a coffee or something. 😀
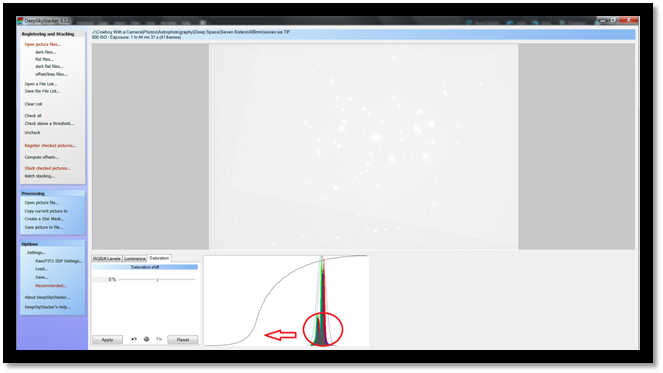
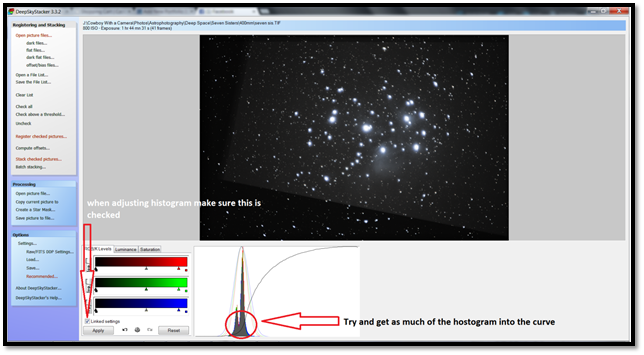
Now you have a stacked image that may appear darker or lighter than the image you were hoping for so you will have to adjust the histogram accordingly. Try to get the curve nicely into the RGB area and hit apply. Note no changes will happen until you hit apply and if the changes are not what you like, hit reset and apply. Next, you can adjust the curve itself but is really not needed. Saturation can be tricky to adjust. You want to add some saturation to bring the colours out but without pushing it so far that the object appears unnaturally coloured or you change the background colour. Minor adjustments can be made later on in Photoshop (Ps) or Lightroom (Lr).
Example A – A histogram too far to the white and dark side
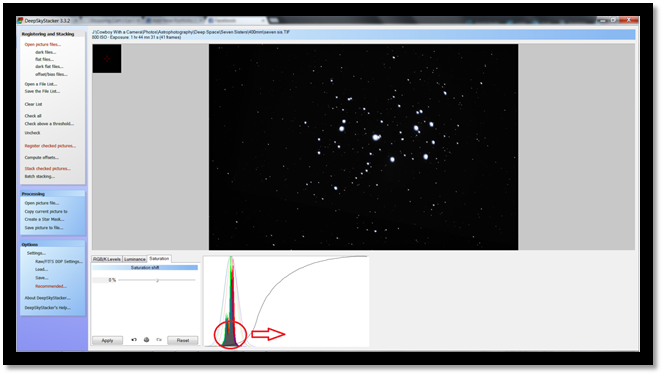
Example B – Proper histogram and some saturation added
Lightroom or Photoshop Edit
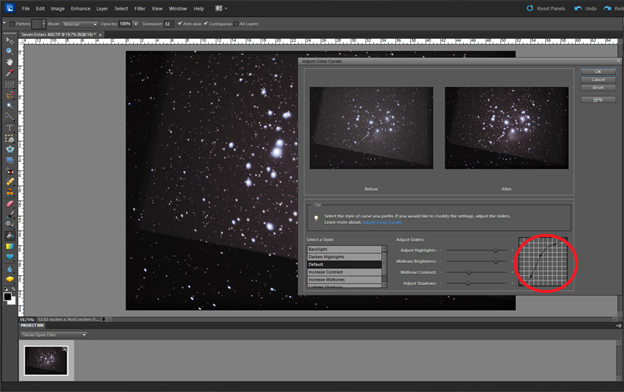
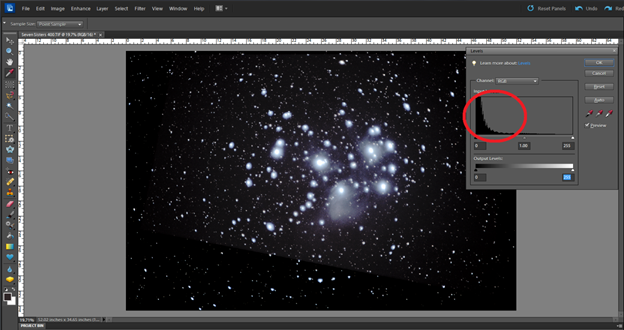
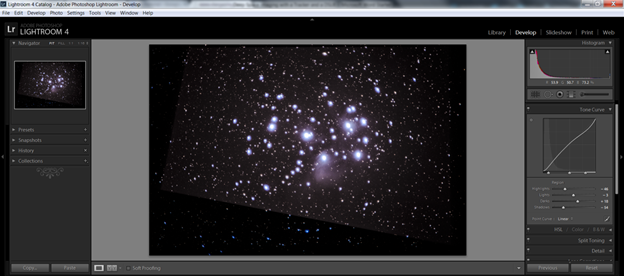
Now that you have a stacked image from DSS you can load it into (Lr) or (Ps) to do the final adjustments in order to bring the most out of your image. In Ps the first thing is to make a curves adjustment to bring out more detail from the histogram. Making the shape of an “S” to darken the blacks and bring out the whites and mid tones. Once you have finished the curves adjustment you can do a levels adjustment to bring the blacks out of the background. The best way to do this is to slowly adjust the curves and levels. By doing this multiple times you will to pull more information from the histogram without pushing the histogram so much it spikes. Once this is done you can do your final adjustments to the white balance to make the stars true in colour.
Adjusting the Curves – Ps
Histogram Spiking – Ps
Curve – Lr
Final Image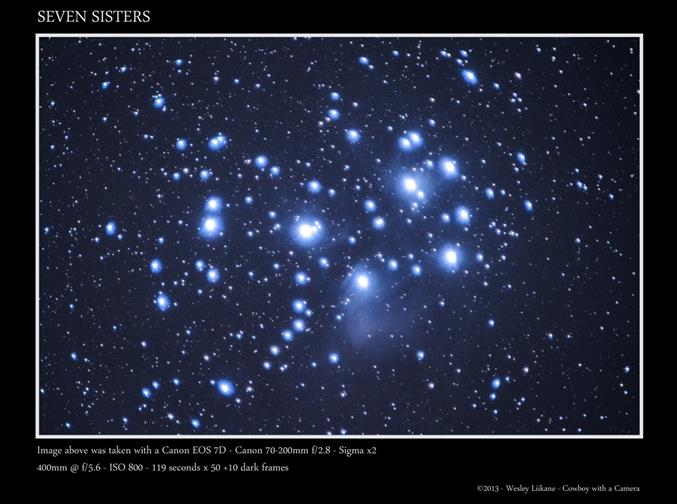
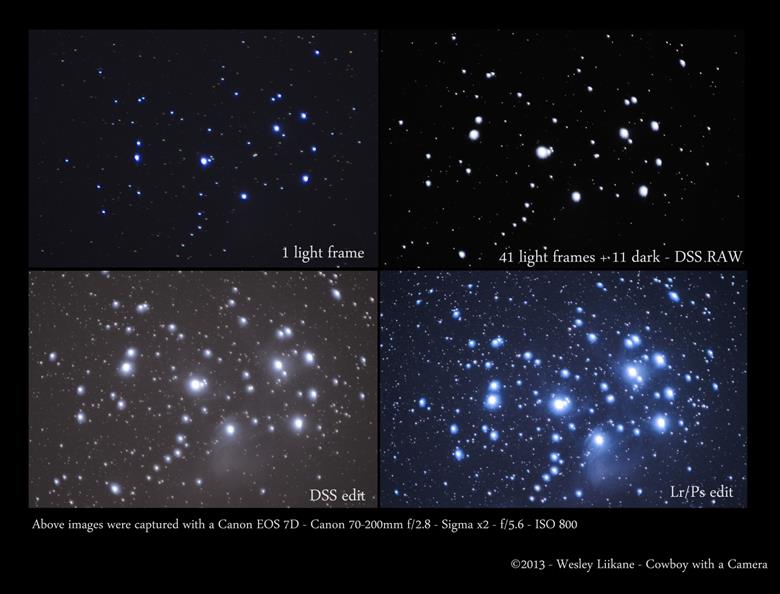
Detail vs Time
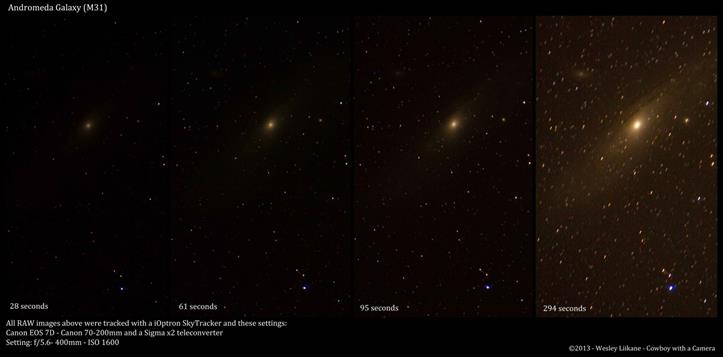
Andromeda @400mm
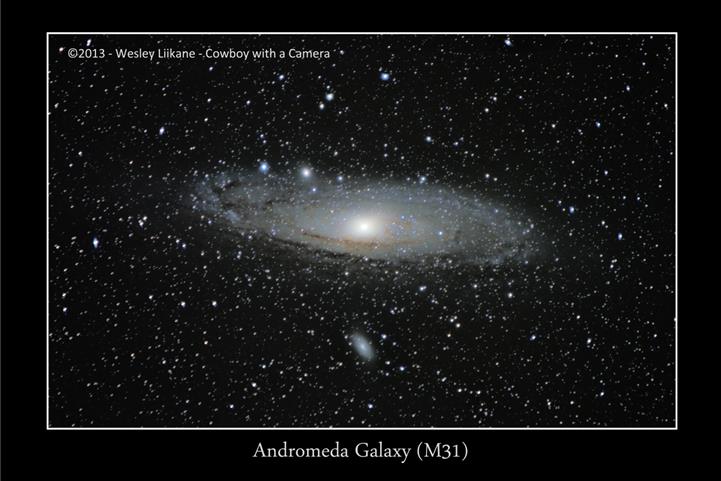
Hi Wesley,
You say, “The tracker you can make or purchase.” How would you make one?
Thanks for all of the inspiring pics and information.
Cathy
WOW… This is great… thank you Wesley! I can’t wait to do some night photography.